How to Tighten Oil Filter
When tightening your oil filter, you need to guarantee a secure seal without over-tightening, which can cause damage or leaks. Start by lubricating the gasket with clean oil, then hand-tighten until the gasket contacts the mounting surface.
From there, a precise additional turn is essential—too loose, and you risk leaks; too tight, and you may damage the filter or threads. Understanding this balance is key before moving on to the next steps.
Key Takeaways
- Hand-tighten the oil filter until the gasket contacts the mounting surface, then tighten an additional 3/4 to 1 full turn by hand.
- Apply a thin layer of fresh engine oil to the filter gasket before installation to ensure a proper seal.
- Use a compatible oil filter wrench only if specified, and follow manufacturer torque guidelines to avoid over-tightening.
- Clean the mounting surface and inspect filter threads for damage before installation to prevent leaks and cross-threading.
- Avoid over-tightening which can damage the gasket or filter housing, and ensure proper torque maintains a secure, leak-free fit.
Why Proper Oil Filter Tightening Prevents Leaks and Engine Damage
Why does tightening your oil filter correctly matter? Because an improperly tightened filter can cause oil leaks, leading to engine damage. When you tighten the filter to the manufacturer’s specifications, you ensure a proper seal between the filter gasket and the engine block.
Over-tightening risks crushing the gasket or damaging the filter housing, while under-tightening creates gaps that allow oil to escape. Avoid irrelevant discussion or unrelated tangent about other maintenance tasks; focus strictly on the oil filter’s role in maintaining engine oil pressure and preventing contamination.
Proper torque guarantees that the filter stays securely in place under engine vibration and thermal expansion. This precision protects your engine from oil starvation, overheating, and premature wear, preserving performance and longevity.
Essential Tools and Tips for Tightening Your Oil Filter Correctly
How do you make sure your oil filter is tightened properly without risking damage or leaks? Using the right tools and following specific tips ensures a secure fit.
First, select a wrench compatible with your filter type to avoid slipping or crushing the filter. Consider oil viscosity when applying torque; thicker oils may require a slightly tighter seal.
Always hand-tighten initially, then use a torque wrench if specified by your vehicle’s manual.
| Tool | Purpose |
|---|---|
| Oil filter wrench | Grip and turn filter |
| Torque wrench | Apply precise torque |
| Clean rag | Wipe sealing surfaces |
| Oil can | Lubricate gasket before fit |
What to Do Before You Tighten Your Oil Filter
Before tightening your oil filter, make sure you have all necessary tools within reach, including a wrench and clean oil.
Clean the oil filter mounting surface thoroughly to ensure a proper seal. Double-check that the new filter’s gasket is lightly coated with oil to prevent leaks.
Gather Necessary Tools
A proper oil filter installation starts with having the right tools at hand. Begin by gathering an oil filter wrench suited for your filter type; different models require specific wrenches, especially when dealing with filters vs. cartridges.
You’ll also need a clean rag, a drain pan, and the appropriate oil specified for your vehicle. Review tips for oil change to ensure you have a torque wrench if your filter demands precise tightening.
Avoid guessing the force applied, as overtightening can damage the filter or housing. Confirm the filter’s compatibility and type before proceeding. Prepping these tools guarantees a smooth tightening process, reduces the risk of leaks, and ensures your oil system functions optimally.
Stay organized and ready before you start.
Prepare The Oil Filter Area
Where should you focus your attention when preparing the oil filter area? First, you need to prepare the filter area thoroughly to ensure a proper seal and avoid leaks. Follow these steps carefully:
- Clean the mounting surface of any old oil, dirt, or debris. Use a clean rag to wipe the area, preventing contamination.
- Inspect the oil filter threads for damage. Securing threads in good condition is critical to avoid cross-threading or leaks.
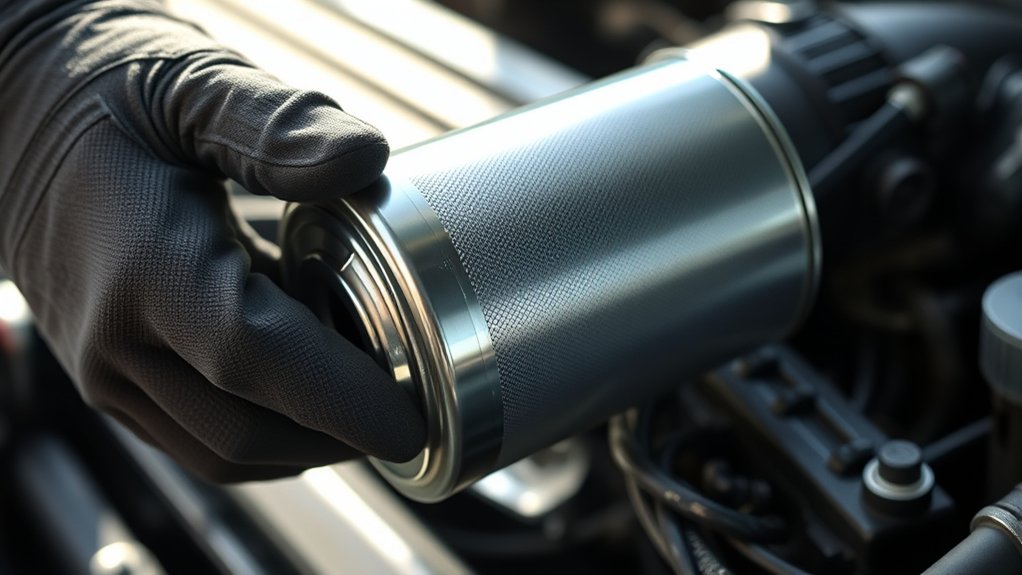
- Lightly lubricate the rubber gasket of the new oil filter with fresh engine oil. This step helps create a better seal and eases tightening.
How to Tighten Your Oil Filter, Step by Step
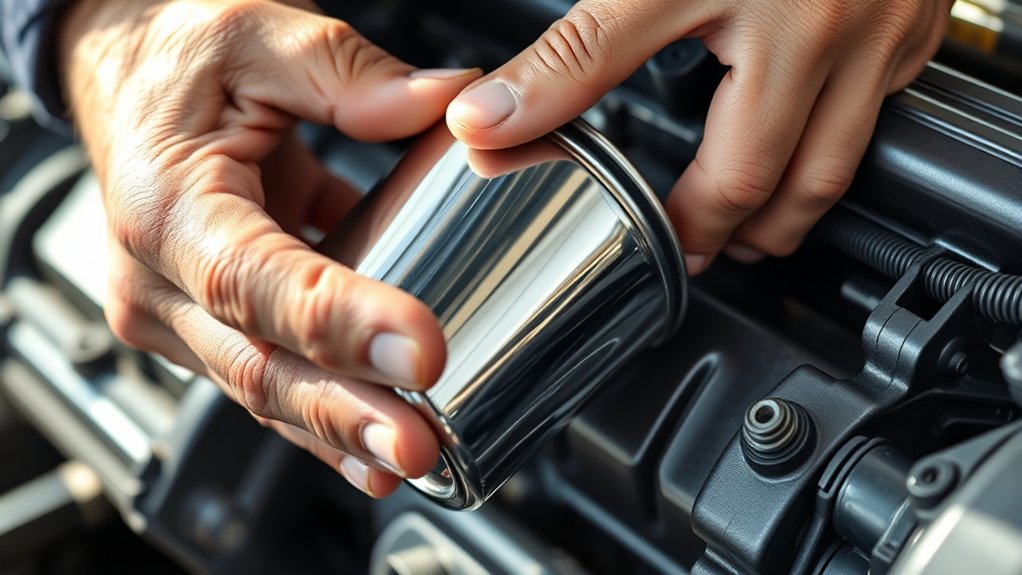
First, make sure you prepare the oil filter by applying a thin layer of clean oil to the gasket for a proper seal. Next, position the filter correctly and tighten it by hand until the gasket contacts the mounting surface.
Finally, use a wrench to turn the filter an additional three-quarters to one full turn, ensuring a secure fit without over-tightening.
Preparing The Oil Filter
How should you prepare the oil filter before tightening it to guarantee a proper seal and avoid leaks? Proper preparation is essential for a secure fit. Begin by thoroughly cleaning the mounting surface to remove old oil and debris.
Next, lubricate the rubber gasket on the new filter with a thin layer of fresh engine oil. This ensures a tight seal and prevents the gasket from cracking. Finally, check clearance around the filter to ensure there’s enough space for tightening without obstruction.
- Prepare tools: gather the appropriate oil filter wrench and a clean rag.
- Clean mounting surface: remove residue and inspect for damage.
- Check clearance: verify sufficient space for filter installation and adjustment.
Proper Tightening Techniques
Why is proper tightening essential when installing your oil filter? Ensuring the correct torque prevents leaks and damage to the filter or engine.
Start by confirming the oil filter sizing and thread pitch match your vehicle’s specifications to avoid cross-threading. Apply a thin layer of clean oil to the filter’s rubber gasket to create a proper seal.
Screw the filter onto the engine’s mounting stud by hand until the gasket contacts the base. Afterward, tighten the filter an additional 3/4 to 1 full turn by hand, following manufacturer torque guidelines if available.
Avoid using tools unless specified, as overtightening can strip threads or deform the gasket. Proper tightening guarantees a secure seal, preventing oil loss and maintaining engine performance.
How to Avoid Common Oil Filter Tightening Mistakes
Where do most oil filter tightening errors occur? They usually happen during installation, especially if you overlook critical steps. To avoid mistakes, follow these precise actions:
- Avoid Over-Tightening: Use your hand to tighten the filter until the gasket contacts the mounting surface, then apply an additional 3/4 turn. Over-tightening risks damaging absorbent filters and gasket deformation.
- Ensure Proper Gasket Prep: Lightly oil the gasket before installation. This prevents sticking and allows for easier removal without compromising a seal.
- Skip Scent Testing: Don’t rely on scent testing or smelling the filter area for leaks. It’s inaccurate and unsafe. Instead, visually inspect for oil seepage after running the engine briefly.
What to Do If Your Oil Filter Is Too Tight or Too Loose
What steps should you take if your oil filter feels too tight or too loose? First, avoid using excessive force to loosen a tight filter to prevent damage to the sealing surface. Use a proper tightening gauge or an oil filter wrench designed for your filter size.
If the filter is too loose, it risks leaks or detachment. Check the vehicle’s torque spec in the service manual and retighten the filter accordingly, typically hand-tight plus a quarter turn.
For a too-tight filter, carefully apply penetrating oil around the base, wait a few minutes, then use a tightening gauge or wrench to loosen it gently. Always clean the mounting surface before reinstalling.
Finally, verify with the tightening gauge that the oil filter meets the exact torque spec to ensure a secure, leak-free fit.
Frequently Asked Questions
How Often Should I Replace My Oil Filter?
You should replace your oil filter every 3,000 to 7,500 miles, depending on filter compatibility and vehicle specs.
Avoid recycling misconceptions, as improper disposal harms the environment. Always follow manufacturer guidelines for optimal performance.
Can I Use Any Oil Filter Brand for My Car?
You shouldn’t use any oil filter brand; ensure brand compatibility and check filter ratings specific to your car’s engine. Choosing a filter meeting OEM standards guarantees proper fit, filtration efficiency, and maintains engine performance reliably.
What Type of Oil Should I Use With My Filter?
You should use oil with the correct viscosity specified by your vehicle’s manufacturer to ensure engine compatibility. Check your owner’s manual for recommended oil grades, as using the right viscosity optimizes filter performance and engine protection.
Is It Safe to Tighten an Oil Filter by Hand Only?
Yes, you can safely hand tighten the oil filter, ensuring you perform a thorough filter seal inspection beforehand. Hand tightening prevents over-torquing while maintaining a secure seal, reducing the risk of leaks and damage.
How Do I Dispose of Used Oil Filters Properly?
Don’t toss used oil filters in the trash; instead, drain them fully, then take advantage of local recycling programs.
Disposing oil filters properly prevents contamination and supports environmental safety by recycling valuable metals and fluids responsibly.
Conclusion
Now that you know how to tighten your oil filter correctly, consistently care for your car by carefully coating the gasket, turning it till it touches, then tightening to the torque or recommended turns. Avoid awkward accidents by evaluating tightness accurately and always applying appropriate tools.
Steer clear of slip-ups like over-tightening or loose fittings to secure a spotless seal. Follow these steps faithfully, and your engine will stay smoothly safeguarded and leak-free.
By mastering how to tighten oil filter properly, you ensure your vehicle runs efficiently and remains protected from leaks.